Monday, August 16, 2010

Save Widget Below of the Header

Few days ago, there are some friends who ask me, “ How to save widget below header exactly? ” Generally, we can’t save widget or element, right in below of header in Blogger template. Usually, we can only put element or widget in top of Post element, but of course width of that element just as wide as ‘post width’. Then maybe you will ask me, “ Do we have some ways, to save widget or element, exactly below the header? ” The answer is…. Of course, we can…. In fact, we have a lot of ways for fix that thing. But, in order that there are limitations of times and places, I can’t write all of the tricks here. I will only give you one way for fix that problem. Ready? Okay then, here we go….

Follow my instructions below:

  1. Login to Blogger with your id.
  2. Click Layout.
  3. Click Page Element tab, look at the structure of your layout template. Usually, the header element will be show like this :

    header elemen

  4. We are going to fix this thing. Let’s begin the party!!!
  5. Just click Edit HTML tab.
  6. Click sentence Download Full Template, you must backup this thing. It’s very important!
  7. Find out codes which like this :

  8. Delete that code and change with this one:

  9. Click Save Template button. Wait ‘till this is done.
  10. Click Page Element tab and your layout template will be like this :

    header-element

  11. Feel please to customize your blog with a new Page Element below the header.
  12. In order to add Page Element, you can click Add Page Element. You can add anything you want. And then, you can drag the new element, below of header elementr, if you already finish your business with your new element.
  13. If your setting was done, just click SAVE in top of that page.
  14. Well done, now see the result.

Happy blogging to all.

Link to this post

Free Tool : Scott Box Shot Maker 2.0

Hello guys! i'm glad to meet you again. Now i will give you a cool free tool, this tool named with Scott Box Shot maker 2.0. What's the function of Scott Box Shot maker 2.0? with Scott Box Shot maker 2.0 you can create an ebook cover very easy. Want to try this tool? click at the button below :


download here!


See you again at my free download tool.

Sunday, August 15, 2010

Free SEO ebook : Search Engine Optimization made easy


free SEO ebook Want to get 1 top ranking at Google Search? Need ton traffic to your site? Optimize your site or blog. Don't know what should be do with your blog? Download this SEO e-book and read how to optimize your blog. The creator of this free e-book is Brad Callen. I'm loving this e-book because very simple but complete, good tips and trick. So, don't waiting untill tomorow, go a head to download this e-book. File size to download is only 1.66 MB. Please click at the image button :


download here!

Free Tool : HTML Color v1.4


HTML color V.1.4 Do you a web designer, blog designer, or hobby to edit your blog template? Maybe you need this tool. The name of this tool is HTML Color v1.4, with HTML Color V1.4 you can get HTML color code with easy method because HTML color v1.4 can record the color from image at your monitor, over you mouse computer at the area of your monitor and HTML color v1.4 will give you the HTML code.

This tool is free tool, i'm has been use this tool from a long time ago to help for design my free blog template. No need install, run only. Download file is 184 KB. Want to try this tool, please click at the link below :

download here!


Thursday, August 12, 2010

Split Header Column Became Two Column

Tomorrow night, one of my blog visitors has been ask to me how to insert search engine at the header blog? Hmmmm... All right... I try to answer this question. To inserting a search engine or everything at the header column, you must split your header column became 2 or 3 column. For example I'm has been split my header column became 2 column.

Much technique to split header column, however I will show you my technique at my free template magazine template 1, so before you exercise to split header column please download template here! And then please create a new blog for practice.

Are you ready to do some action with me? All right.. follow these steps. Go to your page element, and you will find template structure like this :

page element

Now we will change the header column become 2 header columns. Click Edit HTML tab, go to your template code and find the code like this :

/* Header
===================================
*/
#header-wrapper {
width:900px;
margin:0 auto 0px;
background:$bgheadercolor url(http://ahom24.googlepages.com/magazine_01.jpg) no-repeat top center;
height:190px;
}

#header-inner {
width:900px;
background-position: center;
margin-$startSide: auto;
margin-$endSide: auto;
}

#header {
margin: 0px;
text-align: left;
color:$pagetitlecolor;
}

Delete above code and replace with this code ;

/* Header
===================================
*/

#header-wrapper {
width:900px;
margin:0 auto 0px;
background:$bgheadercolor url(http://ahom24.googlepages.com/magazine_01.jpg) no-repeat top center;
height:190px;
}

#head-inner {
width:600px;
background-position: left;
margin-left: auto;
margin-right: auto;
float:left;
}

#header {
margin: 0px;
text-align: left;
color:#ffcc66;
}

#r_head{
width:300px;
float:left;
padding-top:10px;
}

Go to lower side and find the code like this :

<div id='header-wrapper'>
<b:section class='header' id='header' maxwidgets='1' showaddelement='no'>
<b:widget id='Header1' locked='true' title='Test Blog (Header)' type='Header'/>
</b:section>
</div>


Delete above code and replace with this code :

<div id='header-wrapper'>
<div id='head-inner'>
<b:section class='header' id='header' maxwidgets='1' showaddelement='no'>
<b:widget id='Header1' locked='true' title='Test Blog (Header)' type='Header'/>
</b:section>
</div>
<div id='r_head'>
<b:section class='header' id='header2' preferred='yes'/>
</div>
</div>


Click SAVE CHANGES button and done.

Now click Page Elements tab and you will see your header column become 2 columns :

new page element

OK guys, now you can add anything at the new element in the right header.

If you feel interest with this post, please digg it.

See you next time at my new tutorial.

Make a D'tree at Menu Blog


d'tee menu 
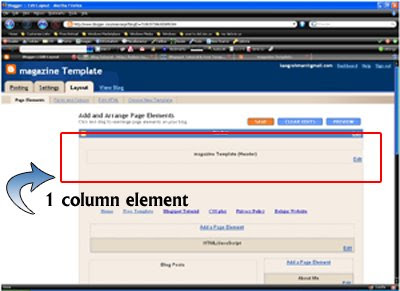
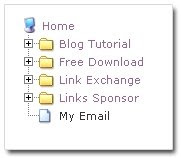
Did you ever seen Window Explorer? At Window Explorer have a beauty menu likely my left banner. Did you know, you can make that menu at your blog. For example, please checkout my example blog here!, this menu named D'tree menu.
Feel interest to make this menu at your blog? here is the steps to make a d'tree menu :


#Step 1
  1. Click layout.

  2. Click Edit HTML tab.

  3. Click the Download full template link. Save your template (very important)

  4. Go to your template code, and find the code </head> .

  5. Copy and then paste following code above of </head>


  6. Click Save Template button.

  7. Step 1 is done.
#Step 2
  1. Click Add a Page Element to make a element.

  2. Choose for HTML/Javascript.

  3. Copy and paste the following code at the element :


  4. Click SAVE CHANGES button.
  5. Done. Now you have a d'tree menu at your blog.
Notes : Original code is from http://www.destroydrop.com. All of links at this tutorial is my link, you must changing the links with yourself links.

Happy blogging!

Magazine Template 1

This is my new free template, named Magazine Template 1. Bellow is screen shot for Magazine Template 1:


Specifications :

Type : Blogger beta template (XML)

Column type : Multiple columns Template
color : white Background color : black
Template Width : 900 pixels
Sidebar width : 300 pixel
Leftsidebar_1 : width : 280 pixel
leftsidebar_2 : width : 275 pixel
bottombar width : 210 pixel Browser test : IE6, FF3 beta 4, opera 9.25, Netscape 9.0.0.6
Download file : 8kb

Download | Demo

Enjoy your new template